July 22, 2011

Color Me Purple (and Green, and Red, and Orange...)

Take a look at this absolutely a-mazing engagement photo session that I found from Fabulously Wed.  It's such a crazy, beautiful explosion of colors that I can hardly stand it. The inner-kid in me wants to try it so bad. To make this shoot come to life, the couple bought Holi powders, which are used by the Hindu population at the Festival of Colors to welcome Spring. These powders are safe for the environment and safe for your bodies, so you can go crazy throwing them at each other without having to worry about toxins. Such a fantastic idea, and so much fun!

Oh, and for even more fun, make these powders yourself! DIY!


July 21, 2011

DIY: Bridesmaid Cards

The girls you ask to stand next to you at the alter are, obviously, special to you. They're the women who have been there for you for as long as you can remember: your relatives, your sisters, your soon-to-be sisters, your best friends. How are you going to ask them to be your bridesmaids on the most important day of your life? Sure, you can write them a message on Facebook, or just blurt it out whenever you feel the urge, but why not make it something more special?

For my bridesmaids, I decided to make cards and send them to my girls, asking them if they would be in my wedding.


The reasons I loved this idea:

1. Handmade = time, effort & appreciation from the reciever.

2. I could personalize them to include whatever I want. The more personal, the better.

3. It would be a nice surprise for them (if you can keep it a secret!)

4. It would be something they could hold on to forever.

So, that's what I did. I went to the store, bought supplies, and just kind of went for it. I love the way they turned out.


Cute, aren't they? I'm really happy with the way they turned out. I made each one different to reflect their personalities, but you wouldn't necessarily have to.

I don't have a pic of the inside, but basically I glued a piece of printed paper to match the dress on the inside flap, then I wrote each of the girls poems and attached them too (keep reading for an example of the poems).


If you would like to make them yourself, here's some easy steps. They can me made in a couple hours and are cheap to put together!

You will need:

1. Cardstock for the actual card. Get as many or as few colors as you like.
2. Cardstock for the bust of the dress if you want it to be white (I chose one with a swirly pattern).
3. Printed paper for the skirts/inside the flap of the card. You can get this in the scrapbook section of any craft store.
4. Tulle. You can buy small rolls of tulle in any craft store.
5. Stickers for decoration. I bought sticky pearls for the side of the card, as well as the waist of the dress. You can get anything you like.
6. Very thin elastic.
7. Monogram beads (one for each girl)
8. Glue. 

Instructions:

1. Cut the cardstock to the size of card you want.

2. Carefully, fold the cardstock in half. You will now have a normal-looking, folding card.

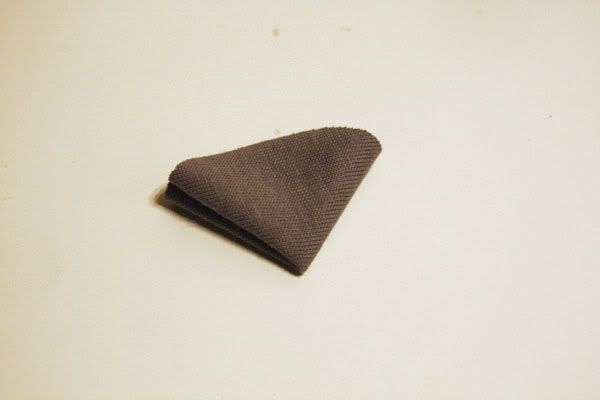
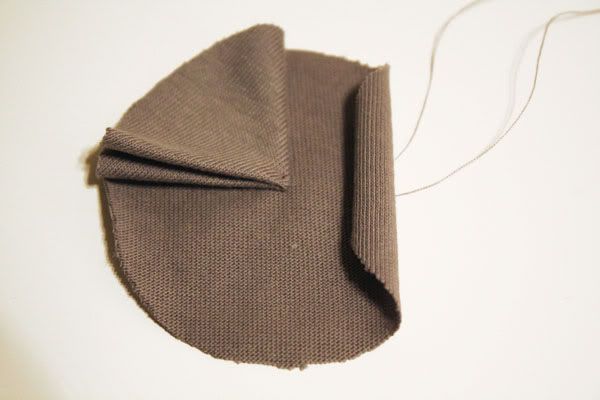
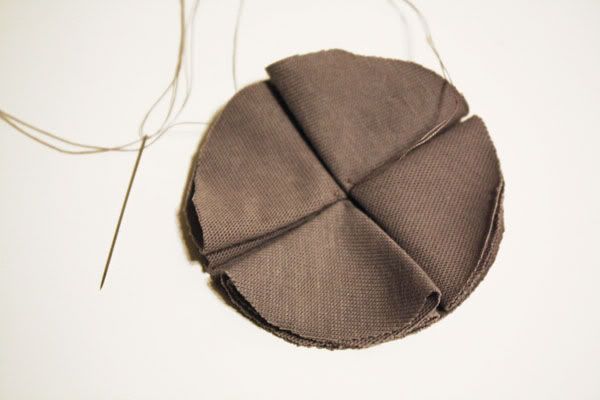
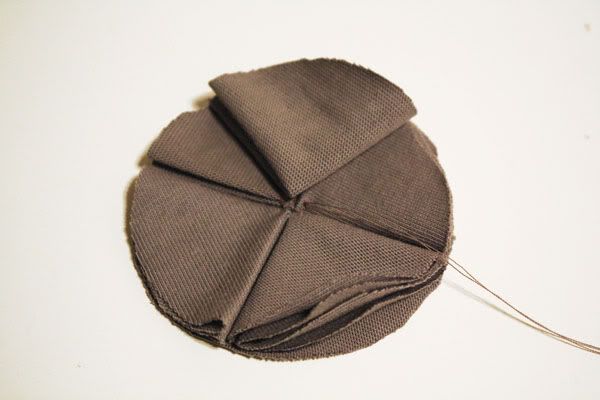
3. Cut out the busts of your dresses (the white part) I basically cut out a heart shape, then cut the point off. They don't have to be perfect! Glue the bust to your card.

4. Cut out a piece of tulle for each skirt. Make sure you put enough under each skirt to make it poof out, and stick out the bottom.

5. Glue the tulle to the back of your skirt. Then, glue the TOP ONLY of the skirt to your cardstock, where it goes (butt it up next to the bust to make a dress)

6. Embellish! Stick your pearls or whatever embellishments you have along the side of the card, the bottom of the card, the waist of the dress, wherever you want!

7. Cut out a piece of printed paper (the same print that was on the skirt of the dress) to fit on the inside flap of your card. Glue it down.

8. Write a note, poem, or whatever you want on the inside. I actually wrote four different poems on the computer, printed them out, then glued it to the printed paper on the inside.

9. Once your card is ready to go, slip your monogram bead on the elastic, wrap it around the card to hold it shut and tie it in a bow!

10. Send or give them to your girls!

Here is the poem that I wrote for my maid of honor:


Rashelle,

The day has come when I will be
Married to Brandt, finally.

I love him so much, that is true
But one thing’s for certain, I love you too.

You’ve been there for me for years gone past
Our friendship is one that’s made to last.

As I stand at the alter next year,
With you by my side I’ll have nothing to fear.

There is just one thing that I’d like to ask,
As I’ve chosen you for an important task.

I need you now more than ever,
Be my maid of honor today
and my best friend forever.


Steal mine (I won't care!), or write one of your own. Trust me, they will love them. My girls were so excited. I even got some tears. It's well worth the effort for them to feel special and have something to remember it by.

Any questions, don't hesitate to ask!

July 20, 2011

Bold, Bright & Beautiful

I love it when a couple isn't afraid of a little (OK, a lot) of color. Most brides think that they're only allowed to choose a couple different colors for their wedding scheme...but these pictures prove that's completely untrue. In fact, it's possible to not have to pick a color scheme at all (Gasp!). Just go with an array of bold, bright colors and you'll have a fun, inviting, un-stuffy wedding. There are a ton of different colors in this inspiration board, and they all look great together. Proof that there is no such thing as too many colors.

Also, check out my fellow blogger, Mimi, who is using bright colors in her beautiful wedding!

bright colored wedding
Photos courtesy of Style Me Pretty

Button Me Up

Isn't it crazy how something so simple that you've been familiar with your entire life could all of a sudden turn into a chic wedding decoration? That is exactly what buttons have become. They are so versatile and can be stuck pretty much anywhere in your wedding decor to give it a DIY, vintage feel. Not only will your wedding have "I made this with my own two hands" charm, but you actually CAN make it with your own two hands! Buttons can be used on place cards, or name tags and are even being fashioned into hair pieces and bouquets. The great thing is that if you have lots of buttons lying around, you can finally put them to good use, and you won't even spend a dime. Doesn't get much better than that.

Oh, and if you like the button bouquet featured in the center picture, check it out HERE. It's handmade by a talented crafter on Etsy, and you can purchase one for yourself! At just $100, it's more affordable than flowers, and it will last forever. Talk about a great keepsake!

button wedding
Photos courtesy of Style Me Pretty & Really Bad Kitty

July 19, 2011

Stripes, Please

Does anybody else have a huge obsession with stripes like I do? Like to the point where you hyperventilate when  you see a zebra, or a pirate, or even candy cane? Ok me neither. But, I do love them. I love the fact that they are so clean, simple and structured. For just being simple lines placed next to one another, stripes make a huge impact. I love that they have the power to look really preppy, fun & whimsical, elegant or extremely bold. It doesn't really matter what look you are going for because stripes can be applied to them all.

Photos courtesy of Style Me Pretty

July 18, 2011

Pretty in (HOT) Pink

It's no secret that women of all ages are obsessed with the color pink. Representing love, beauty and caring, it's no wonder so many brides take the plunge into the sea of pink. With an overwhelming array of different shades of the color, it can be impossible to decide which exact hue is right for you. Let's start with the most obvious: beautiful, bright, girly-to-the-max hot pink. Not only is this color ultra feminine, but when used so boldly, it brings such a great energy to your wedding. It's vibrant and exciting, and just so FUN. Isn't that exactly what you want your wedding to be: fun?

Photos courtesy of Style Me Pretty

July 17, 2011

Lovely Lace

It's time. Call up your Grandma and tell her you've finally got a use for her old doilies she's got lying around. Not only will she be extremely happy, but so will you because you'll have just what you need to make a rustic, romantic, ultra feminine wedding. For being so delicate, lace can make a huge impact on your wedding decor. It's so soft and girly and will add a vintage, granny-chic vibe to your big day. You can go for tiny touches here and there, or cover your entire tables with a lace tablecloth. Either way, it will look timelessly beautiful. Trust me, lace isn't just for old ladies anymore!

wedding with lace details
Photos courtesy of Style Me Pretty

Gray and Yellow Wedding

I'm a huge fan of a gray and yellow color combo. It's ultra sleek and modern and oh-so chic. It's a great way to pull off yellow without making your entire wedding looking like a giant bumble bee. The gray really softens the yellow, but makes it pop at the same time. I don't know how it does this, but it does! If  you love the idea of a really contemporary, clean wedding, this color combo is sure to do the job. And it makes me thinks of dolphins and canaries. But that has nothing to do with anything.

gray and yellow wedding
Photos courtesy of Style Me Pretty

July 15, 2011

Time For Tea

There is just something so wonderfully...what's the word?....ah yes, British, about a tea party. That's the only way to describe it. Oh, and maybe, elegant, romantic and regal as well. But British pretty much sums it up. Who doesn't want to feel like the Queen of England, sipping tea out of expensive china on her wedding day? And no, you don't need expensive china to pull it off, you just have to feel like it's expensive. In fact, you can go to vintage stores and garage sales and pick up miss-matched tea cups and saucers and pull off a fabulously vintage-chic look.

And, while you're thinking about having a tea party themed wedding, you might as well go all out and have your guests wear big hats and talk in accents. You'll be saying things like, "One lump, or two my dear?" in no time!

tea party wedding
Photos courtesy of Style Me Pretty

Garden Party

I love the idea of having a garden-themed outdoor wedding. It's fun, laid-back, and super outdoorsy. This would be perfect for the couple that's not looking for a stuffy, traditional wedding; it allows for so much freedom! Think watering cans, seed packets (which would make a great favor), and lawn games like croquet. Your guests can sip lemonade and enjoy fresh herbs and spices. And, if you have your reception literally IN a garden, you've got it made. What do you think?!

garden party wedding
Photos courtesy of Style Me Pretty

July 14, 2011

Periwinkle Perfection

It's time for a confession: I am absolutely, positively IN LOVE with this color. I want to propose to it, give it a ring and walk it down the aisle.

I'm not quite sure what it is about the color that I love so much. Maybe it's the fact that it's not overdone (I've hardly seen it used anywhere), or that I can't decide what color it is. It's not purple. It's not blue. Periwinkle perhaps? Or maybe I love it because it's soft and elegant and makes me feel like I'm walking through clouds. Whatever the reason, I am smitten. Meet my new husband: blue-y, purple-y loveliness.

periwinkle wedding
Center: chair
First row: buttons, table, centerpiece
Second row: bride, cake
Third row: bouquet, flowers
Fourth row: bottle, love, shoes, bridesmaids

July 13, 2011

Aurora Jewelry on Etsy

When it comes to picking out small details for you wedding day, like jewelry for example, it can be a daunting task. There are thousands of places to buy jewelry and hundreds of options to consider. It can be tough to even know where to start. I believe that once again, your place to begin is Etsy. What could be better than wearing beautifully crafted, hand made, original works of art? Trust me, going with something unique and special is the way to go. Small boutiques often offer jewelry made by local artists, but, unfortunately, they come at a high price. Start looking at Etsy and you will find all kinds of beautiful pieces in a range of prices. The point is, you don't have to spend a lot to get hand made pretties (yes, I used the word "pretties").


One shop that I love is Aurora Jewerly Boutique. What I like so much about this particular vendor is the quality and love the artist, Rachel, puts into each and every piece. She uses high-quality materials (freshwater pearls, Swarovski pearls & crystals) and makes each pieces to order. She will even work with you to design whatever your little heart desires. Tell her what you're looking for, and she'll handcraft something from scratch. And the best part? Her prices rock my socks. Here are some of my favorite pieces that she sells:

"Evelyn" necklace, $60. Click here for more info!

"Fleur" earrings, $26. Click here for more info!
Starlight Hair Comb, $45. Click here for more info!

"Eternity" Bracelet, $56. Click here for more info!

"Rio" earrings, $56. Click here for more info!


Aren't you in love? I sure am. In fact, I'm smitten. I'm thinking about leaving my fiancé for those earrings.

Oh ya, and check her out on Facebook!

Fall Brides: Color Palettes

I recently talked with a fellow bride-to-be who is struggling with choosing a color scheme (aren't we all) for her October wedding. Check her out here! Since I'm a semi-fall bride as well, I had already done all kinds of research on fall colors. Instead of posting tons of inspiration boards highlighting the different color schemes that I've found, I'm just going to post bouquets. Why? Because often times, bouquets reflect the colors of the entire wedding. I think looking at the flowers is a quick way to see what a certain combo of colors would look like together.

Here's some of my favorites. While some are what we would typically think of as fall colors, others are kind of outside-of-the-box (personally, I love the one on the bottom right). But, no matter what colors they are, they all have that distinctive "fall feeling" that makes me want to play in the leaves and drink lattes.

Photos courtesy of Style Me Pretty

July 12, 2011

By Jeeves, I've got it!

For my own wedding day, I'm still not entirely sure what color scheme I'm going to choose. It's so easy to pick out tons of beautiful wedding themes for other people, but when it comes to my own wedding, it's much much tougher. However, I think I've finally come up with something that just may work! Here's what I had to consider when going through my thought process:

1. My fiancée's favorite color is green.
2. My favorite color is purple.
3. I don't want the purple and green to look like Barney.
4. Our reception venue is black and silver.
5. Our wedding will be in late September, meaning that I wouldn't want too summery of colors.
6. Everything must be drool-worthy.

And voîla! My inspiration board is born. I am obsessed with little black bridesmaid dresses, so that is a must. While purple and green may be a bit, "My eyeballs are burning out of their sockets" when done too brightly and elaborately, I think I can pull it off with HINTS of the colors in muted tones. I can't overdo it. So right now I'm thinking: black, silver, dark purple & green. Ya? Ya? What do you think?

Photos courtesy of Style Me Pretty & The Knot

Let's get fruity!

There's no getting around it, flowers are expensive. And I mean, really expensive. The problem is that most brides think that they can't get away without having flowers everywhere: at the ceremony, the centerpieces, even the bouquets. But, they can get away with it! How, you ask? With fruit, of course! It may sound weird, but fruit makes for beautiful arrangements. They work for centerpieces, name cards, place settings, virtually anywhere that you would normally have flowers. As you can see, I've shown examples for oranges, limes, lemons, pears, apples, and peaches. But, the possibilities are endless. Pineapples would work great for a tropical wedding. Grapes would work for a vineyard wedding. You've just got to not be afraid of trying something new and fresh.

The great thing about using fruit for decoration is that it's cheap. Much, much cheaper than using fresh flowers. They won't wilt, they won't need watered, and heck, your guests can eat them! How many people can say they doubled their centerpieces as decoration AND a snack? Not too many. In all seriousness though, try it. You'll save money and you'll have great looking decorations without much fuss.


Photos courtesy of Style Me Pretty

July 11, 2011

Yee Haw!

This country-themed wedding is rustic, without screaming "I'm a cowboy!" in every detail. More obvious cowboy items (boots & hats) are paired with country-chic pieces to make a very subtle and classy spin on the barn wedding. This just shows you can have a cowboy wedding without making your guests sit on itchy hay bales in their fancy clothes and they will still feel like they are at an elegant affair. It's a win-win!

I especially love the use of mason jars, and the wild-flower-almost-weed bouquets. Who would think you could cut flowers right out of a field and they could look so darn beautiful? Oh, and the smores. How could I forget about the smores?
Photos courtesy of Style Me Pretty

Etsy finds

What's Etsy? If you don't know what Etsy is, or have never been on their website, you are in for a real treat. The website is dedicated to selling vintage and handmade items from all over the globe. For a small fee, the average Joe, and known artists alike, can put their creations up for sale. The variety on Etsy is unbelievable, as is the talent that these people have. 

If you haven't checked it out yet, let it be known that Etsy should be on the top of your list of websites to visit for wedding inspiration, as well as to purchase one-of-a-kind items. You'll find such great treasures on there, you'll know that noone will have the same thing as you, and you'll be supporting artists from across the world.

Click here for homemade treasures:
ETSY!

Here's just a few of the awesome things I've found, with links to find them yourself. Now go, search, and find a handmade item that's just screaming you name!
Hair Fascinator JMG Jewel Design Click here for more info!

Earrings by Margo's Originals Click here for more info!


Bridal "I Do" Show Stickers byYour Happily Every After Click here for more info!


Bridal gown by Bridal Bliss Designs Click here for more info!


Garter Set by Rosebud Lips Click here for more info!

Invitations by Ivandy27 Click here for more info!


Silk-blend bouquet by Bragging Bags Click here for more info!                                                                                                

The Roaring 20's

The 1920's were full of all kinds of wonderful trends: jazz, the Fox Trot, Mickey Mouse, and most importantly, peanut butter and jelly sandwiches. Aside from these things, one of the most prominent trends that we can take from the 20's is their fashion. Think flappers: fringe, lace, pearls, feathers, and all kinds of other vintage-chic items.

The 20's can be a great inspiration for a wedding. It adds a vintage flair, but can still be soft and romantic at the same time. Modern day flapper dresses for your bridesmaids is a MUST, as is old-school foods (like homemade pies and root beer). It's the type of theme where you've got to be ready to go all-out. Trust me, you'd have fun with this one. And, if you could get your future hubby to learn the Charleston, you're all set.

1920s inspired vintage wedding
Photos courtesy of Style Me Pretty

July 8, 2011

Don't make me blush!

This blush wedding is absolutely the most romantic thing I've ever seen. It's soft, girly, and has that fresh "I just got pinched on the cheek" look.

This color palette is definitely worth looking into if you want all of your guests to fall in love at your wedding. Hey, I really think it could happen! Just know that you will be solely responsible for the bad choices they make during the reception. Can't say I didn't warn you.


Center: shoes
First row: bride, bouquets, macaroons, bridesmaids
Second row: bouquet, place setting
Third row: couple, cake
Fourth row: dress, table number, vase, boutonniere


blush colored wedding

DIY: Blooming Favors

Wedding favors can be a waste of money, especially if it's something  your guests are just going to take home and throw away. That's why I love the idea of these tulip favors: they can be enjoyed even after your wedding is over! They're cheap, easy to make, and will look adorable sitting at your place setting. They would be great for an outdoor or garden-themed wedding, or dress them up for a more traditional affair. If you want to get clever you can always put in a cute saying that has to do with flowers like something to do with  your love "blooming" or "growing". Get creative!

Thanks Project Wedding for sharing the idea.


DIY: Tulip Bulb Favors article photo
Mary Swenson
These seasonal favors are easy, inexpensive, and oh-so-charming!  Put them atop each place setting, arrange them en masse on a favor table, or even group them together in the center of each table for a casual centerpiece that guests can easily take home at the end of your event.
We picked up small pots of bulbs in bloom at our local grocery store for $3.99 each; each pot had 3 flowers in it, which averages to $1.33 per stem.  (Tulips are a colorful and widely-available choice; hyacinths are also a pretty, very fragrant alternative.)


We removed each bulb from the pot and planted it in a small plastic cup.  Each cup was placed inside a mini brown paper bag, decorated with guests' initials.  (If you're using a group of these flower bags as a centerpiece, you can write the table number on each one.)  We punched holes at the top of each bag, and added grommets to the front holes for a finished look.  Stringing ribbon through the holes is a pretty finish, and also keeps the flowers straight in the bag.


Sources:  Mini paper bags can be found at Paper Mart; small white cups by Solo; white paint pen by Elmer's; ribbon and grommets from Michaels
Images Courtesy: Mary Swenson

1940's Wedding

At the end of June I was lucky enough to be in a wedding for two of my good friends Nick & Kayla. Their wedding was such a unique 40's themed affair that I felt the need to make an post inspired by their wedding. The 1940's have such a classic vintage feeling. Suspenders, bird cage veils and pin curls pull the look all together to make you feel like you're living in this booming era.
1940s inspired vintage wedding
Photos courtesy of Style Me Pretty

Oooo, pretty!

With my own wedding coming up in a little over a year, I have been spending hours scouring the internet for centerpiece ideas that I like. It seemed pretty easy to me, until my fiancée and I booked our reception venue. We are having it at YOLO, which is a new reception hall that is hooked onto a night club. So, the place is pretty dark: think black ceilings, gray/silver walls, etc. I've realized that not just any old centerpiece will work for a place like this. Anything I do will just get lost in the dim lights of the room.

Finally, after much searching, I think I've got it: light up centerpieces! Sounds trashy, right? I don't want my reception looking like Showgirls III, for obvious reasons. Luckily, I've found some pictures that I think look up-scale and fun, without any of the sleeze. So here they are. What do you think?

July 7, 2011

Drunk on Sugar @ the Candy Bar

I love the idea of a candy bar at weddings. It's tasty, it looks pretty, it keeps the kiddos occupied for a while, and you've instantly got something to send home with your guests (leave out cute plastic baggies and voila: favors!). Candy bars tend to look best if done in monochromatic colors, so it's usually best to avoid really bright, multicolored candies. Here's some of my favorites:
Photos courtesy of Style Me Pretty & The Knot

Rustic-Chic Wedding

rustic chic wedding
Photos courtesy of Style Me Pretty & The Knot
Rustic & chic. Two words that, by definition, should not go together. However, when they are blended seamlessly into every minute detail of a wedding from the bouquets, to the setting, to the centerpieces, they make for a beautiful experience. There is something so elegant about a wedding that can take non-traditional mediums and make them into a wedding more stunning than one that decks everything out in rhinestones. Who am I kidding? FAR more elegant. This type of wedding is great for outdoor venues because it has a kind of airy, woodsy feeling that is further solidified by being in the great outdoors! Find your inner tree-hugger and enjoy.

July 6, 2011

DIY Fabric Flowers

DIY Wedding Challenge 2010: Fabric Flower  article photo Flowers, Hair, Diy, Fabric

These are beautiful fabric flowers that even the least craft-adept person can manage. You just need to know how to work a thread and needle and you'll be on  your way to sticking these babies everywhere: headbands, sashes, bobby pins, centerpieces, you name it! Thanks projectwedding.com for the idea.


Materials:
Fabric (anything works – from silk organza to your old bedsheets)

Needle

Thread (in a color that matches the fabric)
Large circular object (for tracing around)

Medium circular object(about ¼” – ½” smaller in diameter)
Small circular object  (about 1” in diameter)

Scissors

Process:
1. Trace the large circular object onto your fabric 9 times.
2. Trace the medium circular object onto your fabric 1 time.
3. Trace the small circular object onto your fabric 1 time.
4. Cut out all 11 circles.
5. Set small and medium circles aside.   Take a large circle and fold it into quarters.


6. Place this quarter on top of another large circle.


7. Using a needle and thread, sew the tip of the fabric quarter onto the flat circle.  Make sure you sew through all the layers.
8. Take 3 more large circles, fold them into quarters, and continue to lay them out onto the circle.  To keep the flower perfectly balanced and proportional, make sure all the openings face the same direction. Sew each quarter as you lay it down.  After all 4 quarters have been laid out and sewn, sew a couple times between the quarters to connect them together.


9. Fold another large circle into quarters.  Place this directly on top of another quarter on the bottom layer, and angle it 90 degrees. Again, make sure the opening faces the same direction as the quarters on the bottom layer. 


10. Sew the quarter onto the bottom layer.
11. Repeat this using 3 more of the large circles.  This should form an entire top layer.


12. After the top layer has been completed, remember to sew between the quarters again.
13.  Take the medium circle now and fold it in half.


14. Roll it up into a cone shape.


15. Place it flat against the top layer with the tip pointing toward the center.  Sew the very tip into place.  It should be able to stand upright when you are done.


16. Flip the flower over.  Take the smallest circle fabric and sew it onto the back to cover up your stitches.  If you are attaching a hair clip or headband to the flower, put it between the flower and the small circle fabric.  Sew the circle into place with the hair clip headband sandwiched inside it.


17. Flip the flower over again and fluff it up!
Share

Widgets

Related Posts Plugin for WordPress, Blogger...

Google Analytics